- Data Masking
- Advance Security (TDE, Data Redaction)
- Label security
- Virtual Private Database (VPD)
- Fine Grained Auditing (FGA)
- Data Vault
- Database auditing
- Audit Vault
- Storage/Network authentication
Masking sensitive data
Let me brief you here the need for data masking and how it is achieved in an Oracle database. It is a very common practice to clone production database to a non-production environment for any sort of testing or a new application deployment. If you are working for a financial sector or a high-profile company as an Oracle DBA, it is essential and a common practice to protect the sensitive data using Oracle security solutions or any third party data scrambling solution. Using the Oracle data masking solution, the sensitive data can be secured by replacing it with some fictitious values. This way, an organization can achieve regulatory compliance and avoid data leak or threats.To implement data masking, you will have to follow the 4-step Oracle data masking pack approach, Find, Assess, Security and Test (F.A.S.T).
- The first phase (find) involves identifying the sensitive data, for example, credit/debit card information columns, in a table.
- In the second phase (assess), determine a format of data masking algorithm to apply in conjunction with IT risk team.
- The third phase (secure): apply the masking scripts on the sensitive database before handing over the environment.
- The final phase (test) involves certifying the data masking where the business users validate whether the data has been masked appropriately or requires any further tweaking.
Oracle Database Vault
With traditional database auditing control, a DBA can audit/log application user activities. However, the challenging part is to audit and control the privileged user activities in order to restrict and distribute the duties to the individual privileged (sys) users. With Oracle database vault solution you can control administrative users’ data access and can separate/restrict their duties to specific tasks. For example, if an organization has a group of DBAs, you can restrict individual administrative/privileged users and apply the rules individually. For example, you could have one user just to control user management in the database, another user to handle patch & tuning tasks, another user to monitor, backup duties, etc. Also, you can prevent and apply rules to restrict the viewing of sensitive data by the super-users.With Oracle 12c, the Oracle Database Vault is pre-installed, but doesn’t enabled. To enable the option, either you use Database Configuration Assistant (DBCA) or through SQL command prompt. For more information how to implement this feature, refer to Oracle security documents like Oracle Database Vault Administrator Guide.
Advanced Security
Oracle provides advanced security options to protect enterprise data protection problems. With Oracle Advanced Security solutions in 12c, you can encrypt the data in the database using the Transparent Data Encryption (TDE) option and also on-the-fly data redaction.Data encryption
Oracle TDE solution provides industry standard encryption capability for an Oracle databases, with which you can ensure only authorized users can read the sensitive data in a database. TDE can be applied at column level or at the entire tablespace level; it is transparent and requires no application modifications. Follow the below steps to configure TDE:Specify the wallet location and other details in the sqlnet.ora file, as show below:
ENCRYPTION_WALLET_LOCATION =
    (SOURCE = (METHOD = FILE)
      (METHOD_DATA =
       (DIRECTORY = /oracle/DB_WALLET/<db_name>)
      )
    )
Generate a master key:SQL> alter system set encryption key identified by “welcome”;This will create a wallet in location specifiied in the DIRECTORY above with the password welcome.
To verify wallet details, run the following SQL query:
SQL> select * from v$encryption_wallet;The following demonstrates how to encrypt the data at the column and tablespace level:
SQL> create table card_payment (card_no varchar2(30) encrypt SALT|NOSALT,
       pdate date, amount number(10,2))

SQL> alter table card_payment modify(card_no encrypt using ‘AES256’ SALT);

SQL> create tablespace data_ts datafile size 100m
       encryption using ‘AES256’ DEFAULT STORAGE (ENCRYPT);
The following demonstrates how to stop/start/enable/disable the wallet:SQL> ALTER SYSTEM SET ENCRYTPION WALLET CLOSE; SQL> ALTER SYSTEM SET ENCRYPTION WALLET OPEN IDENTIFIED BY “welcome”;
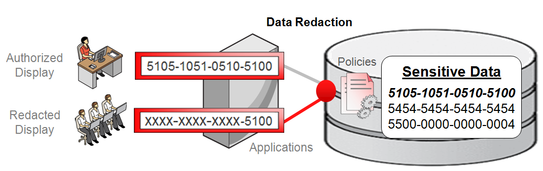
Image copyright: Oracle
Data Redaction
With the Data Redaction feature in Oracle 12c, you can now have selective, on-the-fly redaction of important/sensitive data before the SQL result displaying to the end user. Unlike TDE, the data redaction doesn’t change the actual data, it redacts data on-the-fly, i.e, before the SQL query displays the sensitive data to the application user. You can redact data via different methods: full redaction, partial redaction, Random and regular expression.To configure data redaction, the user must have EXECUTE privileges on the new DBMS_REDACT package.
Image copyright: Oracle
First line of defense – Oracle Database firewall
The Oracle database firewall option prevents database attacks from internal and external accesses by acting as the first line of database defense. It sits on the network layer, transporting data to the application and database layers without any application modification needed.With its highly accurate SQL-based monitoring ability, all unauthorized and suspicious network traffic to the databases is blocked. When the SQL-based policies are configured and defined, the SQL statements will be analyzed before they’re sent to the database and appropriate action is taken. With the white, black and exception lists support, you can define a set of SQL statements that the firewall can see, this can include users, schemas and SQL statements that you need to prevent attacks from reaching the database.
The following image depicts the overall Audit Vault and Database firewall architecture and its functionality:

Image courtesy: Oracle documentation
Oracle Secure Backups (OSB)
Although several third-party vendor-supported Tape-Based backup solutions exist, Oracle Secure Backups (OSB) provides backup encryption, protection and centralized backup solutions. The OSB has built-in support to Recovery Manager (RMAN), protection to the file system on UNIX, WINDOWS and Linux hosts, centralized backup management and its cloud module supports backup on the cloud. The following are the key benefits of OSB:- Centralized tape backup management
- Backups over the cloud
- Supports Exadata backups
- Encrypts backups and secure backup data
- Provides enterprise data protection
Network encryption and storage authentication
In my previous article, I explained how to mask sensitive data, data redaction, controlling super sys privileges, data encryption etc. This segment will cover how to apply security controls in network and storage layers.As part of storage authentication, Oracle provides the following industry standard authentication methods:
- Kerberos: enables single sign-on and centralized authentication capabilities to the Oracle users.
- RAIDUS: provides remote authentication and access with a client/server protocol in a client/server network environment using the smart cards and token cards mechanism.
- Secure Socket Layer (SSL): an industry standard protocol which supports authentication, data integrity and data encryption. Oracle uses the SSL protocol for secure client/server communication, SSL can also be configured to provide server only, client only or both authentication.
Oracle Net Manager offers network encryption configuration options on the client and server. You can choose one of the four (REJECTED, ACCEPTED, REQUESTED and REQUIRED) listed options from the Checksum Level list. Also, the sqlnet.ora file must contain following entries:
<b><span style="text-decoration: underline;">On the server and client:</span></b>
SQLNET.CRYPTO_CHECKSUM_SERVER = [accepted | rejected | requested | required]
SQLNET.CRYPTO_CHECKSUM_TYPES_SERVER = (valid_crypto_checksum_algorithm)
|
Oracle database 12c new security features
It’s time to review a few selective Oracle database 12c enhancements and additions. Here is the list of new features:- With Oracle 12c, a new schema, AUDSYS, is solely used to store the unified audit trail records in the table. Typically, audit records are first kept in the SGA queue and are then periodically written to the AUDSYS schema audit table in the SYSAUX tablespace. This prevents writing the records immediately to the table and improves overall audit trail process. However, you have the ability to overwrite or define the rules on how the audit records should be written, immediately or queued in the SGA.
- RESOURCE role no longer grants UNLIMITED TABLESPACE privilege
- SELECT ANY DICTIONARY no longer provides access to the SYS and DICTIONARY tables
- Unified Audit trail for all individual components: SYS.ADU$, fine-grained auditing, Oracle Database vault, Oracle Label Security etc
- Separate duties of Audit administration
- Enhanced password verification functionality
Common database security practices
It is not a good idea to comprise on data security, at the very least businesses should apply the basic level of database security compliance. According to Verizon’s security survey, 97% security breaches are preventable with a very basic level of security controls. The following are a few security guidelines, in no particular order, which are common basic security practices you should consider adopting in your production environments:- Apply regular PSU patches
- Enable basic level and common database auditing parameters: AUDIT_TRAIL, AUDIT_SYS_OPERATIONS, AUDIT_FILE_DEST
- Limit or grant only required privileges to the database users
- Contain super users and revoke all unnecessary privileges from the PUBLIC role
- Lock down and change the default passwords to the pre-defined, non-administrative database users
- Avoid using the default 1521 port
- Enforce password management profiles, such as password reuse max, life time, password life time etc
- Secure batch jobs
- Encrypt sensitive data
- Control data access
- Maintain SYS.AUD$ table
- Audit and track all important database changes


